User Reporting
User Reporting is part of the Unity Cloud Diagnostics. It is a service that you can use to collect bug reports or general pieces of feedback from your players during your entire development cycle. It's also useful for local development since it allows you to capture a bug report at the time a bug occurs, even if the debugger isn't attached.
A report is a collection of name/value pairs, screenshots, and optional attachments which you can use to analyze issues and feedback about your game.
In your app, you can either use the built-in reporting functionality, build your own customized reports, or use a combination of both built-in and custom report. The built-in functionality provides a simple form that the end user can fill out and submit, which includes a title, description and screenshot. If you choose to build your own reports, you can design the form to collect the data you need. As your needs change, you can adjust which types of reports you are collecting. You do not need to display a form to capture information for a report. For more information on submitting reports without a form, see Automatic user reporting.
Benefits of User Reports
- Capture in-game bug reports or general feedback from your players.
- Include custom fields such as a title, summary, and attachments.
- Analyze device metadata, events, metrics, and screenshots.
- Search your reports by adding filters in the form of dimensions.
- Eliminate the back and forth with your players by getting all of the information you need right away.
- Get notified immediately when a new report arrives through integrations.
Supported Platforms
User Reports are currently available on PC, Mac, Linux, Android, iOS, and WebGL.
Report retention and maximum report size
If you are using Personal edition, reports are kept for 7 days. For all other editions, reports are kept for up to 90 days.
Individual reports are limited 10MB.
Reporting overhead
Idle User Reporting clients do not allocate resources and have negligible overhead. When running, most a reporting operations also have a negligible impact to performance. The notable exception is taking a screenshot. Screenshots have a measurable impact and should be used accordingly.
Memory usage is directly related to the limits you set when you configure a user report. To reduce memory usage, configure the client with lower limits. See Advanced Reporting Features for more information.
Getting started
This topic covers getting started with User Reporting by showing you how to add it to your game, configure it, and view the reports that have been submitted.
For information on adding User Reporting to your app, see Setting up Cloud Diagnostics.
Viewing user reports
User reports appear on the Unity Services Dashboard. If they do not, verify that your report is not over 10MB in size.
To view your reports:
- Sign in to the Unity Services Dashboard.
- Select the relevant Project.
- In the left navigation bar, select Cloud Diagnostics.
- Click User Reports and then click Reports.
- Click a user report to view its details.
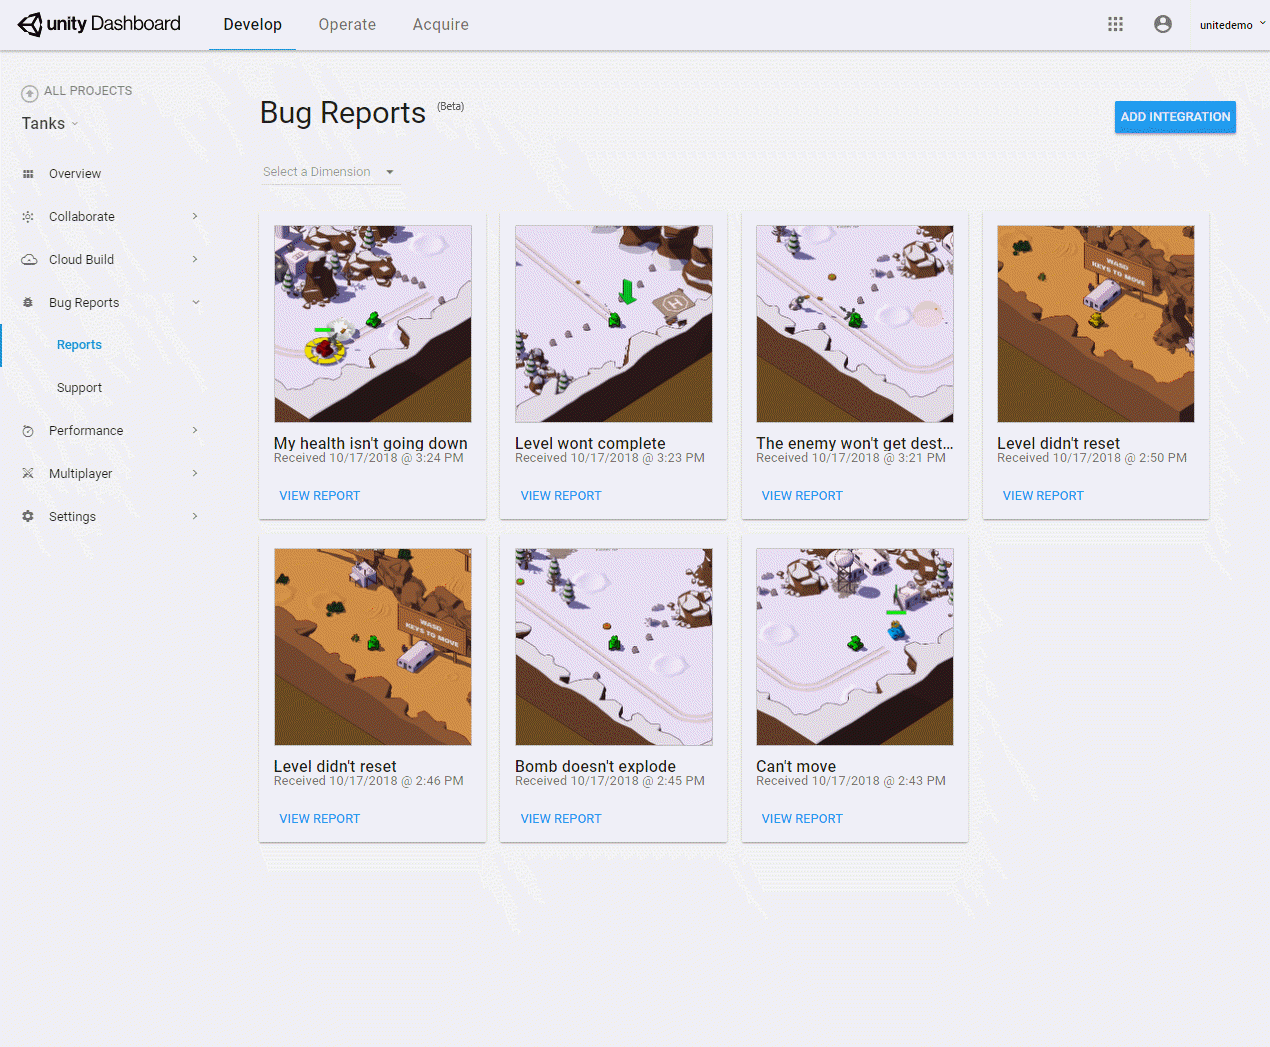
The User Reports window shows the reports you have received. You can filter the reports using the Dimensions drop-down menu in the upper left corner of the window. For more information on creating dimensions, see the Organizing reports with dimensions section below.
To receive notifications, create tracking tickets, or both when a report comes in, use the Unity Integrations service. To configure an integration, click the ADD INTEGRATION button in the upper right of the User Reports window. For more information on integrations, see Unity Integrations.
Viewing individual reports
To view the details of an individual report, in the User Reports window, click the report to view.
The User Report window shows the date the report was received and the summary description. It also shows data such a metrics, screenshots, fields, device metadata, and events. To delete or download the report, use the REPORT ACTIONS drop-down menu.
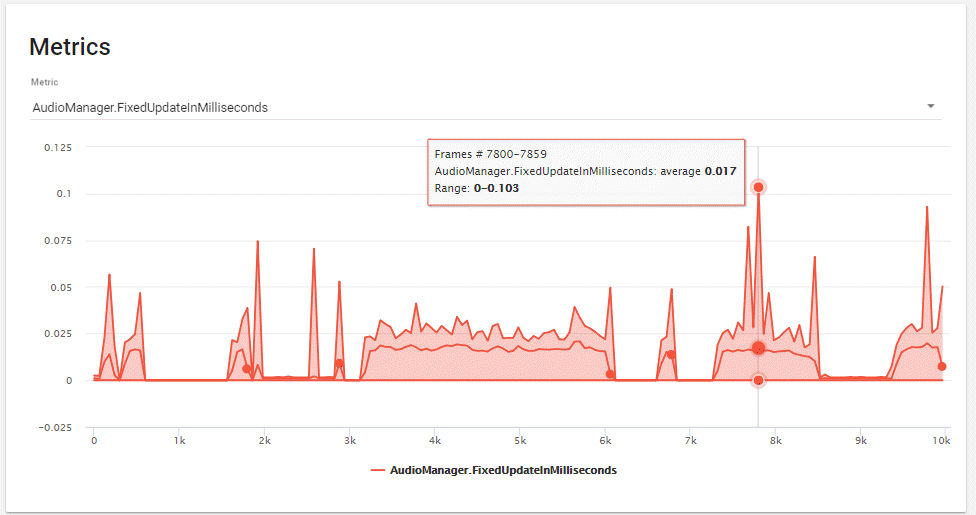
The Metrics section of the report shows the frame number range, the average, and the value range of the particular metric that you specified for the report.
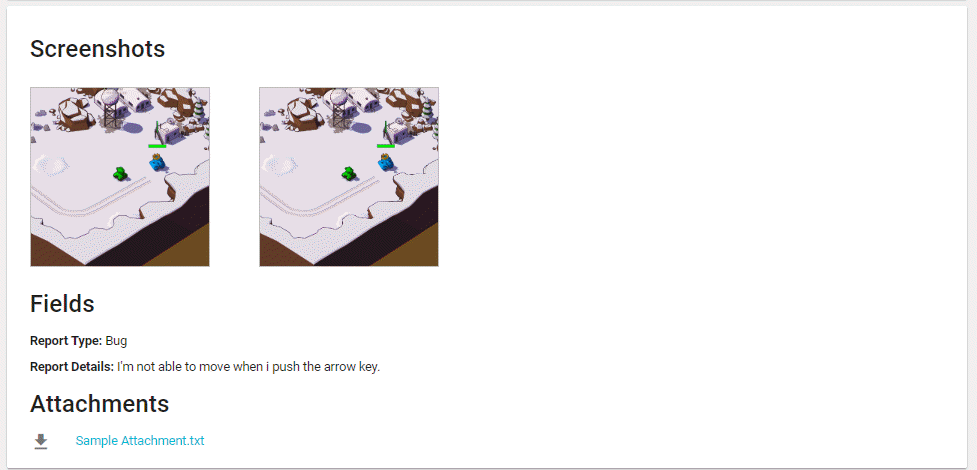
The Screenshots, Fields, and Attachments section of the report displays:
- Screenshots submitted with the report. To view a screenshot in more detail, click it.
- User defined fields submitted with the report.
- Any attachments submitted with the report. To download an attachment, click either the download icon or the attachment name.
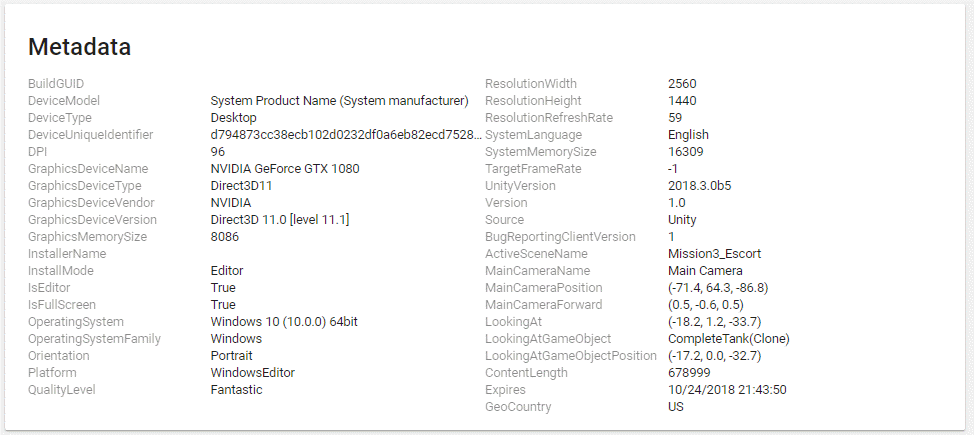
The metadata section provides detailed information about the device and the app from which the report was made.
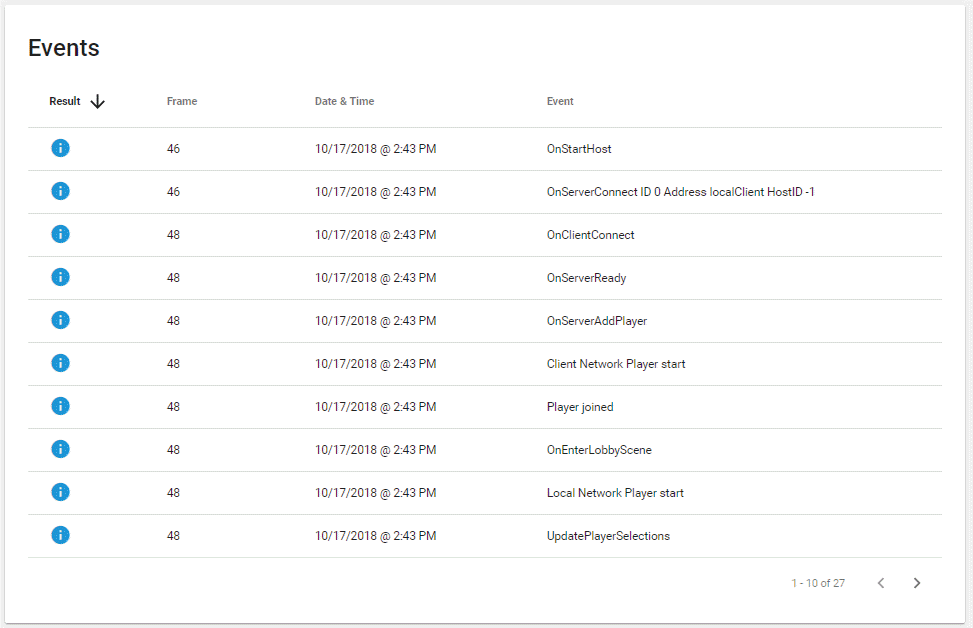
The events section shows console log messages or messages manually provided by the developer. An event entry consists of:
- Result - Result values are Informational (blue circle with an "i"), Success (green circle with a check mark), Warning (yellow triangle with an exclamation mark), and Error (red circle with an exclamation mark).
- Frame - The frame at which the event occurred.
- Date & Time - The date and time at which the event occurred.
- Event - The event that occurred.
Advanced reporting features
The UserReportingPrefab is a starting point. As your Project develops, you'll probably want to add fields to and change the appearance of your form by building your own. In addition, you might want to move the report button into a menu. The UserReportingPrefab provides a reference implementation of how to interact with the client.
Tip: If you move your report button into a menu, create a report when entering the menu. This will capture the state of the game up until that point. If the user does not use your report button, you can discard the report rather than submitting it.
User reports can contain useful information such as device metadata, events, sampling metrics, screenshots, and attachments such as game saves. You can use the API to configure the maximum values for the number of each of the data types to include in your report. The UserReportingScript file, located in the User Reports folder you added to your Project, provides a sample implementation of a user report that demonstrates adding many of these items to a report.
Configuring User Reports
The default settings for User Reports are typically sufficient for normal usage. However, you can customize the following settings:
FramesPerMeasure- A measure is a set of frames. Each measure has a single value for each metric. Measure length is analogous to granularity. The default measure length is 60 frames.MaximumEventCount-The default value is 100.MaximumMeasureCount-The default value is 300.MaximumScreenshotCount-The default value is 10.
There are no limits to these settings.
Note: If you set higher values, you must be aware of how the the collected data affects the size your report. In particular, collecting screenshots can quickly increase the size of the report.
A report cannot include a partial measure. The report is generated after the measure has completed. If you plan on showing a form, extremely long measures are not recommended.
To configure the settings, call the UnityUserReporting.CurrentClient.Configure(UserReportingClientConfiguration configuration) method.
    // Configure Client
    // Change the configuration for frames per measure, events, metrics, and screenshots.
    UserReportingClientConfiguration Configuration;

    if (UnityUserReporting.CurrentClient == null)
    {
        this.Configuration = newUser(ReportingClientConfiguration(80, 200, 400, 20);
        UnityUserReporting.Configure(Configuration);
    }
When you reach the maximum event count, measure count, or screenshot count, the oldest items in each category are automatically discarded.
Adding device metadata
Device metadata allows you to collect device specific data for your game.
To add custom device metadata, call the UnityUserReporting.CurrentClient.AddDeviceMetadata(string name, string value) method.
Adding device metadata has negligible impact on performance.
Logging events
To log custom events, call the UnityUserReporting.CurrentClient.LogEvent(UserReportEventLevel level, string message) method.
Logging events has negligible impact on performance.
Adding sampling metrics
To add custom sampling metrics, call the UnityUserReporting.CurrentClient.SampleMetric(string name, double value) method.
The SampleMetric method is designed to allow to you to call it every frame and to have a negligible impact on performance. However, if you call it every frame, each distinct name defined can add significant size to the report.
Adding screenshots
To add screenshots to your report, call the UnityUserReporting.CurrentClient.TakeScreenshot(int maximumWidth, int maximumHeight, Action callback) method. Screenshots are viewed as part of the report in the Dashboard.
The image is scaled down until fits within the size defined by the maximumWidth and maximumHeight parameters.
When you select a maximum width and maximum height, remember that userreports must be less than 10MB. It's also a good idea to take a large and small screenshot immediately before creating a user report. The last screenshot taken serves as the thumbnail for the report in the Dashboard.
Note: If you use the UserReportingPrefab or the UserReportingScript, they take a large and small screenshot automatically and you do not need to do this yourself.
Taking screenshots has a noticeable impact on performance, unless you're using the Async Screenshotting feature mentioned below. To avoid adverse impact on the player, take screenshots during moments in which performance isn't critical, such as displaying a message or when the player is idle.
When working with screenshots, you can specify a callback that is useful for situations such as:
- Animating a loading bar before presenting the screenshot.
- Showing a screen that allows the user to mark up the screenshot before moving on to the next phase of the user report.
If you do not need to define a callback, set the callback parameter to null.
Async Screenshotting
If your app or game is targeting DirectX on Windows, you can change the UserReportingPlatform on the UserReporting game object in the UserReportingPrefab from Default to Async. The Async User Reporting platform will take screenshots asynchronously using asynchronous GPU readback, greatly improving the performance of screenshotting and decreasing framerate drops. With this feature enabled, you may be able to take a screenshot every frame while maintaining a decent framerate.
Only enable this feature when targeting DirectX on Windows. Enabling this feature on other platforms may result in screenshots not completing and User Reports not being generated.
This feature only works on the User Reporting Unity package installed through the Unity Package Manager on 2018.3 and above.
Taking screenshots from multiple camera angles or multiple sources
In some instances it can be useful to take screenshots from alternate camera angles or sources.
To capture a screenshot, call the UnityUserReporting.CurrentClient.TakeScreenshotFromSource(int maximumWidth, int maximumHeight, object source, Action callback) method.
If the source is null, the screenshot is the screen.
If the source is a Camera, the camera is rendered as the screenshot.
If the source is a RenderTexture, the render texture is used as the screenshot.
Adding attachments
You can add attachments such as video, scene graphs, and save games by adding items to the Attachment property.
Attachments are encoded as Base64 objects.
Using the client directly
If you create customized reports, user reports provide the UnityUserReportingUpdater class. For example:
private void Update()
{
    this.UnityUserReportingUpdater.Reset();
    this.StartCoroutine(this.UnityUserReportingUpdater);
}
If you need more granularity than UnityUserReportingUpdater provides, you can update the reporting client every frame by calling the UnityUserReporting.CurrentClient.Update() method and then update the reporting client at the end of every frame by calling the UnityUserReporting.CurrentClient.UpdateOnEndOfFrame() method.
To create a report, call UnityUserReporting.CurrentClient.CreateUserReport(Action callback).
To send a report, call UnityUserReporting.CurrentClient.SendUserReport(UserReport UserReport, Action callback).
You can also create a new client: new UserReportingClient(string endpoint, string projectIdentifier, IUserReportingPlatform platform, UserReportingClientConfiguration configuration). You can use the UnityUserReportingPlatform class as the input for the platform parameter.
Each client maintains separate events, metrics, screenshots, etc.
Organizing reports with dimensions
Dimensions allow you to filter your reports on the Developer Services Dashboard. You can add dimensions and metrics to your report before sending it by adding items to the dimensions property. Each dimension or metric has a Name and a Value. You can add a new dimension to your report by calling:
report.Dimensions.Add(new UserReportNamedValue("Platform", "Windows"));
Each user report is limited to three dimensions. However, you can concatenate multiple dimensions into a single dimension, as shown in the Platform.Version in the example below.
Example:
If you sent three reports with the following dimensions:
Name = Platform, Value = Android
Name = Version, Value = 2
Name = Category, Value = Graphics
Name = Platform, Value = WindowsPlayer
Name = Version, Value = 1
Name = Language, Value = English
Name = Platform, Value = WindowsPlayer
Name = Version, Value = 1
Name = Platform.Version, Value = WindowsPlayer.1
Then you would see the following filtering options on the dashboard:
| Dimension Name | Dimension Value |
|---|---|
| Category | Graphics |
| Language | English |
| Platform | Android WindowsPlayer |
| Platform.Version | WindowsPlayer.1 |
| Version | 1 2 |
You can also add different dimensions to different reports. For example, you might want to add SystemLanguage as a dimension but only to localization reports.
Users can also add a single hash tag to a report summary. This hashtag appears as a dimension. For example, the summary "I fell through the floor #FloorBug" would appear as:
| Dimension Name | Dimension Value |
|---|---|
| Hash Tag | FloorBug |
Automatic reporting
If you can detect an issue in your game without user intervention, you can create and send a report without ever showing the user a form.
Important: Reports might contain personal information. Make sure your users opt-in to automatic User Reports.
The following are examples of types of issues that you might detect and generate a report for:
- If the FPS has been below 50 for 30 seconds, you could create and send a "Bad FPS" report.
- If the player has entered a prohibited area, you could create and send a "Player in Prohibited Area" report.
- If the player completes a level too fast, you could create and send a "Level Completed Too Fast" report.
It's also recommended that you set IsHiddenWithoutDimension to true. This prevents a report from appearing on your dashboard unless you specify a dimension.
User Reporting VR sample
The User Reporting VR sample Project demonstrates how to implement the Unity Cloud Diagnostics User Reporting feature to collect user feedback in the context of a VR app.